Up to now we've dealt with static visual elements
of Multimedia: graphics and text. It's now time
to introduce another media element, audio or sound.
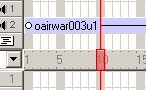
You control sounds in the Score in much the same
way that you control sprites. You place sounds in
one of the two sound channels at the top of the
Score and extend the sounds through as many frames
as required.
Figure 10.1: The sound channel
For this tutorial we are going to control sound
using two methods: in the score and through lingo.
Using the score to play sound is excellent for background
music or other audio that is unlikely to change.
Lingo gives us more control over our sound by allowing
us to choose the file played based on any criteria
we choose (like a user action or a timed event).
Controlling sound with the score
1. Open the score (Ctrl. 4) and locate the sound
channels (see figure 10.1 above). You'll see we
have 2 sound channels in the score. This allows
us to play two sound files at one time.
2. Next we need to import the sound file that we
are going to use, click file > import and locate
the file. For this tutorial we will use the file
bgsound.aif, this sound file is carefully edited
in sound forge to give a seamless audio loop.
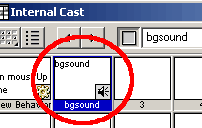
3. Open the cast (Ctrl. 3) and locate the sound
file you've just imported, note that the cast member
has been automatically named bgmusic.
Figure 10.2: bgsound.aif in the
cast
4. We need to make sure that this sound file will
loop over and over again. In the cast select the
sound file cast member and open it's property box
by doing one of the following:
Click on the blue "i" icon on the
top right corner of the cast
Right click on the cast member and select cast
member properties from the options displayed in
the pop-up option box.
Figure 10.3: Changing the LOOP property
of a sound file
5. With the property box open select the loop option
and ensure that this option is ticked. If this option
were not selected the sound file would play only
once.
With the sound file's properties set up correctly
we can now insert the file into the score.
6. Open the score (Ctrl. 4) and locate the frame
that you wish the sound to begin playing. The sound
file will only play if the play back had can see
it, much like any other sprite in the score.
7. With the frame identified, click and drag the
sound file from the cast into the score, into sound
channel 1 starting in the frame identified above.
We have created a sound sprite,
and not unlike a graphic or text sprite, if we alter
the it's parent in the cast then this sprite will
also be altered.
We've identified where/when we want the sound file
to begin, but when should it end? Well it should
end when the user wishes to exit the movie.
8. In the score, drag the end frame of this sprite
to the marker labelled exit. This will ensure that
the background music will only play after the frame
main menu and before the marker exit, in other words
only when the card is in use.
Figure 10.4: Background music in
the score
Controlling sound with Lingo
What if we want our movie to play a sound file
that isn't in the score, or if we want our movie
to be able to play one of a number of sounds depending
on some defined criteria like user input or a timed
event, e.g. click sound for a mouse event and a
ping sound for a keyboard event?
Well we can, using lingo! We are going to add a
click sound to some of the mouse events in our movie.
9. First we need to import the sound file Mouse_Click.aif.
10. Now we need to find an existing script the
handles a mouseUp event. Remember all navigation
links have mouseUp event handlers: so look at the
main menu, select either the company name, and view
the code for this member.
11. Have a look at this code.
on mouseUp
go to frame "Company
Details"
end
When the mouse button is clicked up the play back
head is moved to frame labelled "Company Details".
We also want this mouse event to play the Mouse_Click.aif
sound file.
But the sound file does not exist in the score
and if the playback head cannot see the sprite how
can it play the sprite? Well, we are going to puppet
the sound:
A puppetSound is invoked by declaring the sound
channel to
be puppeted and the sound member
to be played i.e.:
puppetSound
1, "mysound"
Alternatively you an just specify
the cast member and the sound will automatically
play in sound channel 1. However, in our project
the background music is occupying channel 1 so
we will need to specify channel 2 to play the
mouse click (no two sprites can occupy the same
channel or the same space in the score.
12. So, to play the Mouse_Click.aif sound we will
need to add this line of code:
puppetSound 2, "Mouse_Click.aif"
Remember, we need to play the sound in channel
2 because channel 1 is occupied with the BGSound
file.
The complete script should look like this:
on mouseUp
puppetSound 2, "Mouse_Click"
go to frame "Company
Details"
end
This technique can be used for all sorts of audio
requirements from mouse clicks, as we've seen above,
to playing a reminder if a set length of time has
passed without any user input.
13. To complete this tutorial go through remaining
scripts and add puppetSound scripts to relevant
mouseUp handlers.
Giving the user choice
Having added sound to our movie, what if your user
would prefer not to have music? This is something
you should always consider, giving your user the
choice!
14. We're going to add a small "speaker"
icon to the top right corner of the screen, I've
created a small cast the contains the icons you
need, download
it here.
15. Import the two speaker icons into your internal
cast (either copy & paste or drag & drop).
16. Position the "SoundOn" icon in the
upper right corner of the stage and in a channel
that is free for the whole movie in your score (I
have used channel 20).
Figure 10.5: Sound icon on stage
With the sound icon on stage we're
gong to create a cast member scripts that will (1)
mute the sound & change the icon to SoundOff
when clicked the SoundOn icon is clicked and (2)
enable the sound & change the icon back to SoundOn
when the SoundOff icon is clicked.
Why a Cast Member script? As you know there are
many different types of scripts (Cast, Sprite,
Frame, Movie, etc.), and choosing the right type
of script for the job in important.
If we used a cast member script the code is part
of the cast member "SoundOn". As we
are exchanging SoundOn for SoundOff and the action
is only relative to the SoundOn icon (i.e. mute
the sound), this type of script will work very
well.
If we use a behavior or sprite script, the script
is attached to the sprite regardless of the sprite's
parent, so we would have to figure out which icon
is being displayed, this requires a series of
if else statements and can get complicated. Although
it is possible is isn't the right choice.
17. Open the internal cast, select the SoundOn
icon and open the script window for this cast member.
18. The first this to do is exchange
the cast member when the mouseUp event occurs to
this cast member:
on mouseUp
set the member of sprite
20 to member "MouseOff"
end
19. What about the sound mute? Well we're going
to disable the sound property, or set the soundEnabled
to false, add this line of code AFTER the exchange
line:
set the soundEnabled
to false
20. Test you movie to ensure your code works.
21. Everything OK, let's cow code the SoundOff
cast member. Open he script window for SoundOff
and enter the following code: