We first need to plan the page layout, pen to paper!
Avoid trying to design on screen, get the concept
that's in your head down on paper first. Make a
few sketches and when you're happy make a list of
what's required.
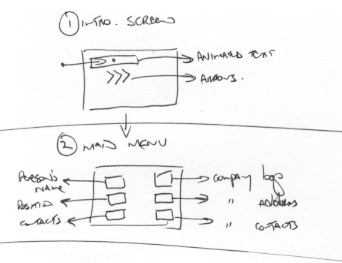
Your storyboard should include sketches of all proposed
screens in your movie in logical sequence with an indication
of how a user would navigation between screens.
The Intro screen will have the text "Interactive
Business Cards Inc." move from the left hand
side of the screen (starting off screen) to the
centre of the screen where it will rest. Once in
position the text will change colour multiple times.
After a short time, 5-10 seconds, three arrows will
move on-stage from the left hand side of the stage.
These arrows will rest centre stage.
From my interface design sketches of the intro
screen below, we'll need a number of text cast members
and an arrow. We will produce the text within Director
and the arrow will be produced in Fireworks and
then imported into Director
Figure 2.1: Initial Project Storyboard
Creating Text
1. Open the text editor (Ctrl. 6)
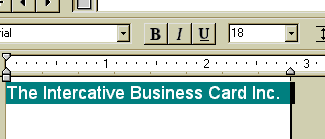
Figure 2.2: Text Editor
2. Select a suitable font face, size and style
from the option boxes.
Use a clear font face, easy to read, Arial is always
a good font to use.
Figure 2.3: Font face, size &
style
3. Type in the words "Interactive Business
Cards Inc."
4. Select the text that you have just typed by
either:
Pressing the Control and A keys
(Ctrl. A), or
use your mouse the select the text.
Figure 2.4: Selected Text
5. Copy that text to clipboard (Ctrl.
C)
6. Create a new text cast member by
clicking on the "+" button in the upper
left-hand side of the text window. This will clear
the text editor window allowing you to produce a
new text cast member.
Figure 2.5: New Text Cast Member
You will find that this is a common
feature of Director's many editors and inspectors.
7. Paste the contents of the clipboard
in the new created blank text window (Ctrl. V)
Figure 2.6: Pasted Text
8. Repeat this process two more times
to create 4 identical text cast members (Steps 6
& 7)
Figure 2.7: 4 Identical Cast Members
9. Using the Tool Palette (Ctrl. 7) change the
colour of the of each text cast member. How?
If it is not already displayed, open cast member
4 by double clicking on the cast member.
Selecting the text of a cast member and changing
the foreground colour of the Tool Palette, this
change will affect the text that is selected.
Click on the Previous Cast Member button, make
sure "3" is displayed in the cast member
number box. Change the colour of cast member 3,
remember to choose a different colour than the
colour applied to cast member 4
Repeat this process to cast members 2 and 1.
Figure 2.8: Tool Palette
Sequencing Text in the Score
1. Once each text cast member's colour
has changed we can now create sprites on stage &
in the score, and sequence them to change their
colour over time.
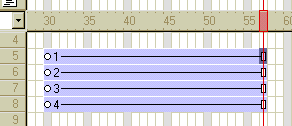
2. Drag cast member 1, drop it into
channel 5 frame 30. Drag cast member 2, drop it
into channel 6 frame 30. Drag cast member 3, drop
it into channel 7 frame 30. Drag cast member 4,
drop it into channel 8 frame 30.
Figure 2.9: 4 Text members positioned
in the Score
3. Making sure that all 4 sprites
are selected in the score, open or bring the stage
to the front by pressing Ctrl. 1 and move all 4
sprites to the top of the stage. How?
Use your mouse to click & drag, make sure
that you keep your mouse button clicked down while
you're moving these sprites. It's a good idea
to have the score in view while you're moving
multiple sprites to make sure that they are still
selected
Alternatively you can use your arrow keys to
move the sprites. By pressing an arrow key once
you will move the sprite(s) one pixel. By holding
down the Shift key while pressing the arrow key
you will move the sprite 5 pixels per key press.
Figure 2.10: Positioning 4 sprites
together
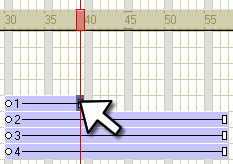
4. With the sprites in place on stage it's time
to sequence them in the score. Select the sprite
in channel 5 and alter it's length so that it ends
in frame 39. How?
Change the value of the "End Frame"
field in the sprite toolbar to 39
Figure 2.11: Using the Sprite Toolbar
to alter the length of a sprite
or click on the "End Frame" symbol
on the sprite & drag the end of the sprite
to frame 39
Figure 2.12: Using the mouse to
alter the length of a sprite
5. Select the sprite in channel 6 and alter it's
length so that it starts in frame 40 ends in frame
49.
6. Select the sprite in channel 7 and alter it's
length so that it starts in frame 50 ends in frame
59.
7. Select the sprite in channel 8 and alter it's
length so that it starts in frame 60 ends in frame
69.
Figure 2.13: Sequencing Sprites
in the Score
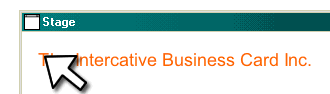
8. Save your movie & play, the colour of your
text will change to 4 different colours over 40
frames.
Figure 2.14: The project so far
We now want to animate the text so that our movie
begin with the text sliding on stage from the left.
To do this we will use Tweening & Keyframe Animation.
"Tweening is a traditional animation term
that describes the process in which a lead animator
draws only the animation frames where major changes
take place, called keyframes. Assistants draw
the frames in between.
To use tweening in Director, you define properties
for a sprite in frames called keyframes and let
Director change the properties in the frames in
between. Tweening is very efficient for adding
animation to movies for web sites since no additional
data needs to be downloaded when changing a single
cast member.
Properties that can be tweened are position,
size, rotation, skew, blend, and foreground and
background color. Each keyframe defines a value
for all of these properties, even if you only
explicitly define one."
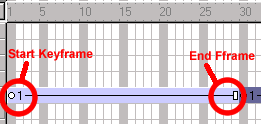
9. Select the first sprite in your sequence (frames
30-39) and copy it (Ctrl. C).
10. Paste this sprite into frame 1 and change it's
end frame to frame 29, see Figure 2.15:
Figure 2.15: Start & End Frames
This sprite's position on stage is exactly where
I want the animation to end (since we are moving
the sprite from an off stage position to it's current
position). Remember a keyframe is a point of change,
if I want this sprite to change on stage I'll need
at least two keyframes, two points of change.
The first frame of every sprite is ALWAYS a keyframe,
this means that I will have to insert another keyframe
to animate the sprite.
11. Select the end keyframe of the sprite and insert
a keyframe by doing one of the following:
Select Insert > Keyframe
Press Ctrl.+Alt+K
Right click on the end frame and select Insert
Keyframe from the pop out menu, see Figure
2.16:
Figure 2.16: Inserting a keyframe
With the second keyframe in place we now have the
facility to animate the sprite, but we still have
to tell Director where the animation begins and
where it ends.
The animation will end at it's current position,
so we will need to change it's starting position.
12. Select the start keyframe of the sprite (frame
1), make sure that ONLY the start keyframe is selected!
13. Open or bring the stage to the front (USING
THE CONTROL KEYS NOT THE MOUSE!) Ctrl. 1
14. Move the selected sprite off stage by either
using your mouse or arrow keys.
Since you have selected the start keyframe ONLY
it is this keyframe that will be affected by this
movement, the end keyframe will remain where it
is but director will TWEEN the frame in-between
these two keyframes thus producing a movement animation
Figure 2.17: The project so far
In this tutorial you have learned how to:
create a number of text cast members
use the tool palette to change the colour of
text.