We've finished the intro screen and it's time to
begin building the main menu or user interface (UI).
This page will resemble a business card & will
have active links to other pages both within this
movie and to other external sites, including a remote
web site.
Creating the Card
1. We need to create and assemble the contents
of the card. From our storyboard we know what is
required:
The Company Logo
The Company Address
The Company Telephone Number
The Company Fax Number
The Company E-mail Address
The Company Web Site Address
The Employee Name
The Employee Position
The Employee Department
The Employee E-mail Address
Begin building the user interface from channel
5 frame 120. Create the sprites as listed above,
make sure that all of the sprites are of equal length,
layered one after the other and start & finish
together, see figure 3.1 for guidance.
Figure 3.1: Card Sprites in place
ready for animation
2. Once you've created or imported these assets
into your score position the sprites on stage, see
figure 3.2 for guidance.
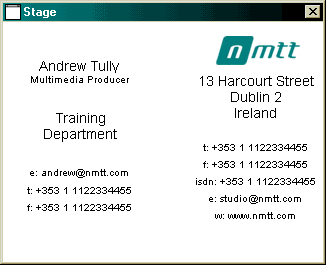
Figure 3.2: Finished Card
We have created the finished business card. We
are now going the apply keyframe animation to the
sprites to create a little "coming-together"
animation to introduce the card for the first time.
This card will act as the main menu and will be
animated only once, on start up.
Refer to tutorial 2 for instruction on keyframe
animation and create a short animated sequence to
introduce the main menu contents, see figure 3.3.
Figure 3.3: Animated Menu
Introduction to Lingo
With the user interface in place we need to start
constructing the the destination screens and adding
the necessary code that will allow our viewer to
navigate through the contents of the card.
The first thing we need to do is to prevent the
play-head from leaving the main menu. We will achieve
this through lingo by writing a Frame Script.
A frame script is a type of behavior, and all behavior
are pieces of coded instructions stored in the cast.
Since a behavior is a cast member it can be used
over & over.
In addition to creating a script we are also going
to create a separate cast for it and to include
all the scripts in our movie. Using additional casts
allow us to organise the assets used in our movie
and create a more efficient workflow process.
1. To create a new cast do one of the following:
Click File > New Cast (Ctrl.+Alt+N)
Open the cast (Ctrl. 3), click the "choose
cast" button (upper left corner) and choose
"New Cast" for the drop down list.
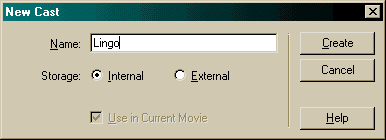
2. From the "New Cast" option box type
the name "Lingo" and choose "Internal"
as the preferred storage type
Internal—stored inside the movie file and
exclusive to that movie
External—stored outside the movie file and
available for sharing with other movies
Figure 3.4: New Cast Options
3. With the Lingo cast open we now need to call
up the frame or behavior script editor by double
clicking on the cell in the frame where you want
the script to be placed.
Figure 3.5: New Text Cast Member
4. Within the script window Director will start
the code for you by printing the following
on exitFrame
end
The first line "on exitFrame" in the
event that will call this handler, so the action
code that I write will only run when an "exitFrame"
event occurs. An exitFrame event occurs when the
playback head leaves a frame.
The space between the event line and the end of
the code is where you will write your action code.
The action code is an instruction or set of instructions
that director will perform when the event occurs.
The action code that we are going to write will
tell the play head to return to the beginning of
the frame that it is about to leave, this will effectively
pause the movie since the stage is only redrawn
when the play head moves to a new frame.
The code is "go the frame". The word
"go " tells the play head to jump to the
frame indicated, the words "the frame"
refer to this frame or itself, therefore the code
reads "on exit frame go to the beginning of
the frame you are leaving"
on exitFrame <event>
go the frame
<action>
end <end code>
Figure 3.6: Go The Frame code, note
the text in <> should not appear in the code
Close the script window, save & test your movie.
The play head should stop running once the main
menu is in place on stage.