Director Tutorial 6- Text Fields & Variables
At this point we have a functioning Interactive Business Card.
The card begins with an intro sequence that could act as a loader screen while giving our viewer a chance to settle down & concentrate on the contents of your creation.
The viewer clicks on one of the links on the main menu to view either:
- Company Details Page
- Employee's Department Page
- Employee's Personal Details Page
Are we finished? If you want an ordinary business card then our work here is done, but we want a lot more! There needs to be:
- access to web sites
- we should be able to e-mail from the card
- we should be able to personalise the card for our viewer
- secure & password protected areas of the card for sensitive information should be available
- controlled audio-visual content and more..
Lets start by looking at Text Fields & Variables that will help us enable our viewer to type their name into a field when the card starts and during the life time of the movie we will display their name on every screen.
1. A Text Field is very similar to the Text Cast Member that you have used previously. Text Fields have very useful properties that we can set and change both at design time and run time. For this project we will use a text field to allow our viewer to enter their name at run time: this is achieved by setting it's Editable property to TRUE.
Create a space in your score for the "Login Screen", about 10 frame will suffice, making sure that you insert a "go the frame" script to prevent the play-head from moving any further than the login screen (remember this type of script is a FRAME script and will be called when an exitFrame event occurs).
Now let's create a text field:
To create a Field do one of the following:
- Choose Insert > Control > Field.
- Click the Field tool in the Tool palette and then drag on the Stage to define the area of the field.
Figure 6.1: Inserting a Field from the Tool Palette
2. With the Field created you now need to name it "Username". We will refer to the text field by this name later.
Let's now look at building the login screen. You'll need a text cast member "Please Enter Your Name:" and a push button "Log In".
3. You know how to create a text cast member (tutorial 2), to create a simple push button do one of the following:
- Choose Insert > Control > Push Button.
- Click the Field tool in the Tool palette and then drag on the Stage to define the area of the push button.
Figure 6.2: Inserting a Push Button from the Tool Palette
4. The newly created button should have a cursor blinking in it's centre. Type the words "Log in" there.
5. With the assets for the login screen created we can now assemble the sprites on stage, see below.
Figure 6.3: Complete Login Screen on Stage
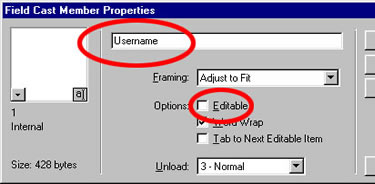
6. With the page layout set, the next step is to ensure that our user can type or edit the text field at run time. By default, text fields are not editable at run time, to change this setting open the text fields' cast member properties box and enable the EDITABLE option (see the figure below). Also make sure that this text field is named correctly.
Figure 6.4: Text Field's Cast Member Property Box
With our user now able to enter his/her name into the text field we now need to look at storing their name as a VARIABLE for the duration of this movie.
Director uses variables to store and update values. As the name implies, a variable contains a value that can be changed or updated as the movie plays.
By changing the value of a variable as the movie plays, you can do things such as store a URL, track the number of times a user takes part in an online chat session, or record whether a network operation is complete.
Variables can hold any of the types of information found in Director: numbers, strings, TRUE or FALSE values, symbols, lists, or the result of a calculation.
We are going to store our user's name in a variable called "User". Our user's name will be the name typed into the text field "username". In Lingo We refer to a text field as MEMBER "the name of the text field", and we refer to the contents of a text field as "THE TEXT OF", therefore we will refer to our users name as "THE TEXT OF MEMBER "USERNAME".
In order to store the contents of "username" in the variable"User" we need to SET the variable to the contents of "Username":
set User = the text of member "username"
We want each page of our business card to say "Welcome username" (with the word username replaced with the actual name of the user) to give the card a personal touch. To achieve this we will place a text sprite "Welcome" to the left of a field containing the users name. We cannot use the text field "username" because this field is editable at run time. We will need to populate another field with the contents of "username", this new field will have it's editable option disabled.
7. Create a new text field and name it "username2"
When our user enters their name they will click on the "Login" button to proceed, therefore we will need to apply the code to this button.
8. Edit the text properties of the field "username2" so the it is left aligned, the font style is regular and the font size is no larger than 10 points.
This will ensure that the text displayed in username2 will correspond to the properties above and not to the properties set for the field "username".
9. We will be writing a Cast Member script for this button, to open the script for a cast member do one of the following:
- Select the cast member and right click, select Cast Member Script for the pop out menu
- Select the cast member and click on the script icon on the cast toolbar
- On stage, select the sprite and click on the cast member properties icon on the sprite overlay (the blue "i" icon), from the properties box select the "Script" button
Director will start the script for you with:
on mouseUp
end
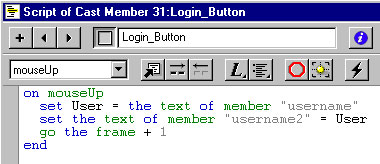
When the mouse button is clicked up we need the variable "User" to be set to the contents of the text field "username".
Once that operation is complete we then want the field username2 to be populated with the variable "User".
When both operations are complete we want the playback head to move to the next frame.
10. Enter the following code:
Figure 6.5: Passing a variable
With the un-editable"username2" now containing our users name we can now insert this field on every page of our business card with the text member "Welcome" for that personal touch (making sure that the text properties match that of "username2", i.e. the font style is regular and the font size is no larger than 10 points.
Figure 6.6: The Project so far
In this tutorial you have learned how to:
- Create, set the properties for, and edit text fields
- Create a button and code it to perform multiple actions on a single event
- Store the contents of a field as a variable
- Pass a variable to another field
Click HERE for the .DIR file of this tutorial
Back to director tutorials