Director Tutorial 8- Film Loops & Behaviors
"A film loop is an animated sequence that you can use like a single cast member. For example, to create an animation of a bird flying across the Stage, you can create a film loop of the sequence of cast members that shows the bird flapping its wings. Instead of using the frame-by-frame technique, you create a sprite containing only the film loop and then animate it across as many frames as you need. When you run the animation, the bird flaps its wings and at the same time moves across the Stage."
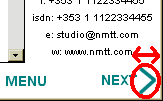
We are going to create a film loop for two of the navigation buttons on the bottom of our destination screens (BACK and NEXT), see figure 8.1 below:
Figure 8.1: Navigation Buttons
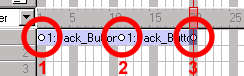
Each button will be animated by moving the arrow left to right and left again over 10-20 pixels:
Figure 8.2: Navigation Buttons
If you are unsure, refer to tutorial 2 for instruction and information on keyframe animation
With the Next arrow animated (see Figure 8.2) we can now produce a film loop.
Figure 8.2: Navigation Buttons
1. In the Score, select the sprite we want to turn into a film loop (the arrow).
"Use sprites in as many channels as you need in film loops—even in the sound channel. Select sequences in all the channels you want to be part of the film loop. You can select sprite fragments if you first select a sprite and choose Edit > Edit Sprite Frames. Control-click (Windows) or Command- click (Macintosh) to select sequences that are not in adjacent channels."
2. To create a film loop do one of the following:
- Choose Insert > Film Loop.
- Copy the sprite(s) selected and paste them into a free cast member
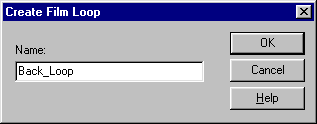
A dialog box appears asking you to name the film loop. Name it "Back_Loop"
Figure 8.3: Create Film Loop
3. Enter the name "Back_Loop" for the film loop.
Figure 8.4: Create Film Loop
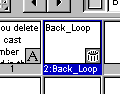
Director stores all the Score data and cast member references as a new film loop cast member.
4. Create a film loop for the NEXT text.
The plan is to animate the arrows when the mouse moves over the the text sprite, how do we do this?
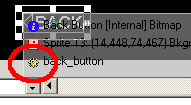
5. On stage select the "back" text
6. Click on the BEHAVIOR icon on the sprite overlay, if cannot see the sprite overlay select VIEW > SPRITE OVERLAY > SHOW INFO
Figure 8.5: Create a Behavior from the stage
7. In the behavior inspector create a new behavior and call it "Back_button"
8. Open the script editor for this behavior, you should see the words:
on mouseUp
end
In lingo we refer to a sprite by the channel number it occupies, so for example if a sprite were in channel 2 that would be referred to as "Sprite 2".
Also in Lingo we can refer to a cast member by it's number, or "memberNum"
Every sprite has a parent cast member! So every sprite has a memberNum! Same thing.
If I wanted to change the parent cast member of a sprite I'll have to reassign it's memberNum property, in fact I would be saying something like set the memberNum of Sprite x = a new memberNum.
We want to swap the parent of the arrow sprite when the mouse rolls over the text sprite, so we want this code to run when a mouseEnter event occurs:
on mouseEnter
set the memberNum of sprite x to y
end
where x is the sprite number of the arrow and y is the cast member number of the film loop.
Having taken care of the mouseEnter event let's look at when the mouse leaves the sprite.
Remember, we are still working within the Back_button behavior!
9. We need to create another event handler within this behavior, this time a handler that will handle the mouseLeave event:
on mouseLeave
set the memberNum of sprite x to y
end
where x is the sprite number and y is the cast member number.
So, your back_button behavior should look like the following:
on mouseEnter
set the memberNum of sprite 8 to 30
end
on mouseLeave
set the memberNum of sprite 8 to 20
end

Additional Notes:
A Film Loop behaves just like any other cast member, with a few exceptions:
- When you step through an animation that contains a film loop (either by using Step Forward or Step Backward or by dragging the playback head in the Score), the film loop does not animate. Animation occurs only when the movie is running.
- You can’t apply ink effects to a film loop. If you want to use ink effects with a film loop, you need to apply them to the sprites that make up the animation before you turn the animation into a film loop.
- Lengthening or shortening a sprite containing a film loop does not affect how fast the film loop plays. It changes the number of times the film loop cycles.
If you need to edit a film loop and you’ve deleted the original Score data it was based on, it’s possible to restore the Score data for editing. Copy the film loop cast member to the Clipboard, select a cell in the Score, and then paste. Director pastes the original Score data instead of the film loop.
If you delete any cast member used in the film loop from the Cast window, Director can’t run the film loop. You can edit or reposition the cast members in the Cast window, but the cast members in the film loop must remain in the same cast for the film loop to work.
Behaviors are scripts that are directly attached to either a frame or a sprite. In older versions of Director, these were called frame scripts or sprite scripts, and you might still encounter those terms. All of the code in Director's Library Palette are behaviors that you can use in your movies. Behaviors differ from movie scripts in that their code is limited to the frame or sprite to which they are attached. So, if you have a mouseDown handler in a behavior attached to a sprite, that handler is executed only when you click on that specific sprite.
Figure 8.6: The Project so far
In the tutorial you have learned how to:
- Create a Film loop
- Create a score behaviour
- Dynamically exchange a cast member using Lingo
Click here for the .DIR file for this tutorial
Back to director tutorials